Orchestrator API - Part 2.

In the second part of our orchestrator API series, the discussion will be focusing on how APIs can be used to automate deployment and ease operative tasks.
The previous post began a journey with the aim of exploring the API functionality of UiPath’s Orchestrator. Initially Orchestrator API posts were intended to be a duology (think trilogy, but for two), however following in the footsteps of any good sitcom with prequels, sequels, spin-offs and others, the remaining section of the topic proliferated into two other blog posts (for now) - the first being the one below.
Previously a brief introduction to how one may call these APIs was presented, then a section was dedicated to showcasing how these API endpoints can be used as an alternative solution where the standard functionality may fall short.
Today, the discussion will be focusing on how APIs can be used to automate deployment and ease operative tasks.
Deployment between environments is a manual, linear and repetitive task. Usually, the following happens within an adequately regulated enterprise architecture (with 3 different environments):
1. The finalised UiPath script(s) is(/are) packaged, and it is(/they are) published to Orchestrator by the developer and some form of an installation document is provided. The installation document outlines what processes, assets, queues, custom packages etc. will have to be configured.
2. The operation team follows the installation document, and the solution is installed onto the test environment.
3. Deployment and environment tests take place à If these are all successful, the solution is ready for user testing.
4. Once user testing has been completed and the Go-live date has been set, the solution will be moved onto the production environment.
Step 2. and 4. can be automated with the use of orchestrator APIs. Assuming that the firewall has already been pierced, the task is rather simple: retrieve all data from orchestrator A (DEV) and populate Orchestrator B (TEST) with the retrieved data. (In case piercing isn’t available the process can still be automated, but it will be segmented into two separate processes – in such case no direct authentication will be required.) Hence, if the deployment is automated via a robot process, then there is only one authentication call that is necessary as the robot will be able to authenticate into the orchestrator where it was started from. Once authentication has been handled, all data can be retrieved from Orchestrator A (DEV) and populated into Orchestrator B (TEST). A process migration can follow a path similar to the following:
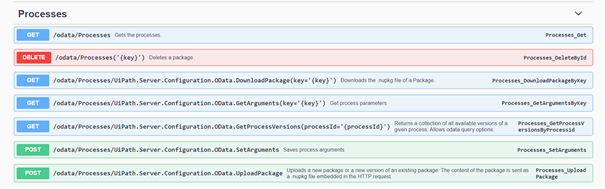
- In DEV the /odata/Process endpoint with GET method can be used to identify the unique key that locates a package for a given process (the key is unique over version numbers).
- Then, once the key has been retrieved the /odata/Processes/UiPath.Server.Configuration.OData.GetArguments(key='{key}') endpoint with GET method can be used to download the .nupkg file that contains the process.
- Then on TEST the /odata/Processes/UiPath.Server.Configuration.OData.UploadPackage endpoint with POST method can be used to upload the retrieved package.
A quite similar pattern can be followed for process schedules (/odata/ProcessSchedules), assets (/odata/Assets) and queues (/odata/QueueDefinitions).
Operative tasks can also be recreated. Mass user creation, mass user access right modifications, mass user activation or deactivation or mass user deletions are all tasks that can be automated through API calls. For instance, a simple mass user creation can be achieved in the following manner, once roles and all user details have been provided in an input file:
1. The /odata/Roles endpoint with GET method can be used to retrieve the corresponding role identifiers.
2. Then the /odata/Users endpoint with POST method can be used to create the user.
A marginal modification would allow the solution to handle mass user modifications as well:
1. The /odata/Roles endpoint with GET method can be used to retrieve the corresponding role identifiers.
2. Then the /odata/Users endpoint with GET method can be used to get all user identification numbers.
3. After the user has been matched to a key, then for all users where only an update is needed /odata/Users({key}) with PUT method can be updated.
4. Then for all other unmatched users the /odata/Users endpoint with POST method can be used to create the user.
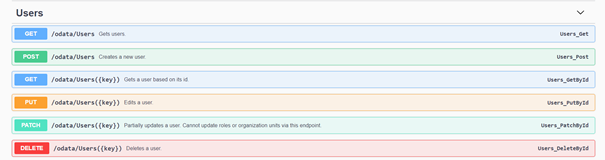
The other mentioned tasks would follow a quite similar pattern. One could activate or deactivate a user using the /odata/Users({key})/UiPath.Server.Configuration.OData.SetActive endpoint with POST method or even delete any users using the /odata/Users({key}) endpoint with DELETE method.
All these endpoints can be found by navigating to the swagger page of Orchestrator. One is safe to assume that almost all if not all functionality that can be found on the UI of Orchestrator can be used via one of the listed API calls.